Create Beautiful Documents with Python
I recently offered a loan to a business owner to help her getting started. We agreed that she will eventually start to repay the debt gradually in monthly increments, once her business starts to run reasonably well.
To keep track of her liabilities, I needed a tool to automatically compute the current residual depth based on interest rate and amount already paid. To achieve full transparency, a statement should be issued on a monthly basis, showing all the relevant information. The statement should be printable as well, so she could hand it out to the tax office or other board members if necessary.
All the data I shall provide are the date and amount of the monthly payment, which I would look up manually in my online banking application. I decided that it was not worth the effort to automatically export my bank account statement. I don’t even know if this would be possible.
Which tool(s) should I use?
As a software developer, I was little involved in creating reports like account statements or recurrent business reports, so I am not very familiar with the tools out there to achieve this. I came across solutions using Excel and VBA macros, custom Word templates, or expensive PDF creation tools. They where either too complicated, too rigid or yielded results that looked old fashioned to me.
In contrast, there are many static website generators which take advantage of powerful template libraries and create beautiful, modern looking blog posts. I concluded that I want to harness the power of such a tech stack to create my automated documents. It would allow me maximum freedom with functionality and layout, without any quirks or workarounds.
After a few thoughts I quickly came to the conclusion that the technology of choice hereby is… Python! Python offers the following tools:
- Native support for computation with rational numbers, i.e.
Decimaldata type - Jinja2 as a HTML template library
- Beautifulsoup for HTML tree manipulation
- cssutils to mess with CSS stylesheets
- Pyppeteer to provide Python port of puppeteer, a powerful automation tool to control a (headless) Chrome browser
- Straightforward readers for JSON, YAML or CSV input
How to get there
Let’s start with the calculation of the residual depth. Based in Switzerland, I use the “30/360 method” with an interest rate of 5%, which is common in this country.
Given the amount payed each month, the corresponding monthly residual claim can be simply updated using
The math
interest = Decimal(1) / 12 * residual_claim * RATE
residual_claim = residual_claim + interest - payment
By using the Decimal data type, we make sure that we don’t introduce any rounding errors.
The template
The Jinja2 library provides a very convenient API for rendering HTML templates. The expressions should already give you an idea how the template syntax works.
For simple layouts, I prefer using skeleton, a dead simple, responsive CSS boilerplate.
By applying the u-full-width class to the main container, the layout fills the full width of the page, and hence, results in a nicer printing format.
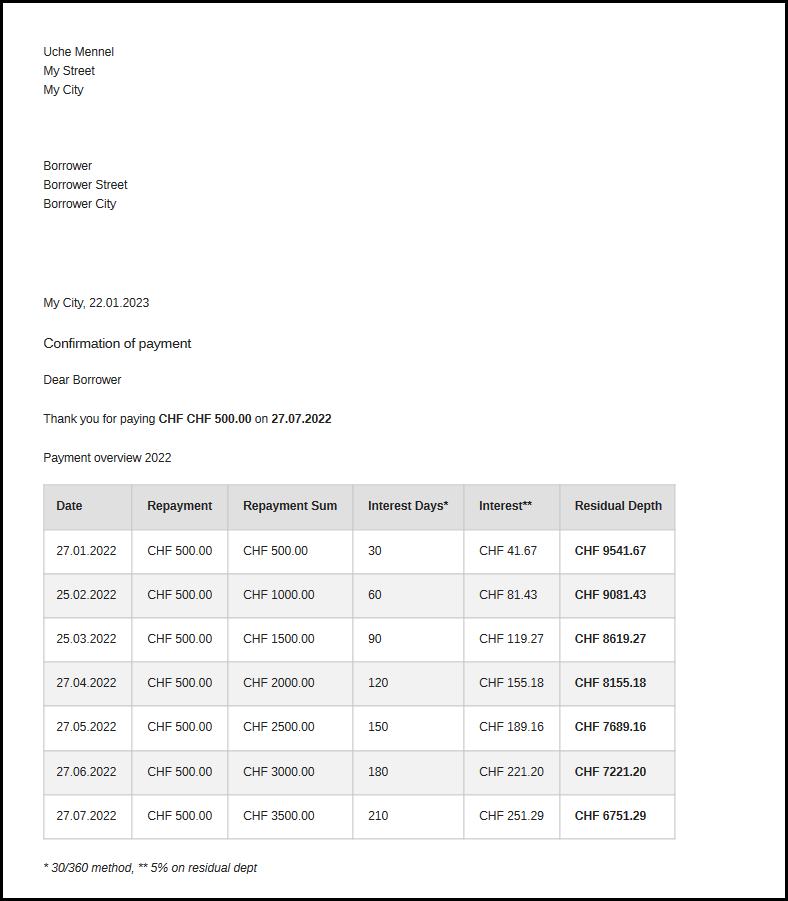
Here is an example of a Jinja2 template which create a formal letter where the payments are listed.
<!DOCTYPE html>
<html lang="en">
<head>
  <meta charset="utf-8">
  <title>Residual Depth</title>
  <meta name="viewport" content="width=device-width, initial-scale=1">
  <link rel="stylesheet" href="skeleton.css">
</head>
  <style>
    html {
      font-size: 50%; }
    thead {
      background-color: #e0e0e0;
    }
    tr:nth-child(even) {
      background-color: #f2f2f2;
    }
    table, th, td {
      border: 1px solid;
      border-collapse: collapse;
      border-color: #c0c0c0;
    }
    th:first-child, td:first-child {
      padding-left: 12px;
    }
    th:last-child, td:last-child {
      padding-right: 12px;
    }
  </style>
<body>
  <div class="container u-full-width">
    <div class="row">
      <p>Uche Mennel<br>
        My Street<br>
        My City
      </p>
    </div>
    <div class="row">
      <p style="margin-top: 3em">Borrower<br>
         Borrower Street<br>
         Borrower City
      </p>
    </div>

    <div class="row">
      <div style="margin-top: 5em">
        <p>My City, Sun Jan 15 2023 00:00:00 GMT+0000 (Coordinated Universal Time)</p>
        <h5>Confirmation of payment</h5>
        <p>Dear Borrower</p>
        <p>Thank you for paying <strong>CHF </strong> on <strong></strong></p>
        <h6>Payment overview </h6>
      </div>
    </div>
    <div class="row">
      <table class="u-max-full-width">
        <thead>
          <tr>
            <th>Date</th>
            <th>Repayment</th>
            <th>Repayment Sum</th>
            <th>Interest Days*</th>
            <th>Interest**</th>
            <th>Residual Depth</th>
          </tr>
        </thead>
        <tbody>

        </tbody>
      </table>
      <p><em>* 30/360 method, ** 5% on residual dept</em></p>
    </div>
  </div>
</body>
</html>
Rendering the document
An important detail is to provide the locally formatted date strings.
For the current region, the locale is set to “de_DE”.
import locale

_ = locale.setlocale(locale.LC_TIME, "de_DE")
Applying the template is pretty simple. The payment data comprises the data context. The document is then rendered by applying the given context to the HTML template code.
def render(template: str, context: dict) -> str:
    html = jinja2.Template(template).render(**context)
    return inline_css(html)
The following step is not crucial, but makes the solution much more robust. We will use the browser to print the document. Therefore, the browser will have to follow all the links in the document to perform the rendering. To prevent any issues with external link, I inline all the CSS code into the document. This can easily achieved using the following hack:
def inline_css(html: str) -> str:
    soup = BeautifulSoup(html, 'html.parser')
    for link in soup.find_all('link'):
        if "stylesheet" not in link.get('rel'):
            continue

        href = link.get('href')
        if not href.startswith('http'):
            href = 'file://' + pathname2url(os.path.abspath(href))

        sheet = cssutils.parseUrl(href, validate=False)

        style_tag = soup.new_tag("style", type="text/css")

        style_tag.string = sheet.cssText.decode(sheet.encoding)
        link.replace_with(style_tag)

    return str(soup)
Now the resulting HTML page can be rendered in the browser and should already yield a decent result.
However, I’d like to automate the rendering step a bit further, by embedding printing information and generating a PDF document.
Finally, Print to PDF
Last but not least, we will use a headless Chrome browser to print the document to PDF.
The Javascript library Puppeteer is well known for driving the Chrome browser for running automated tests or printing web pages.
With Pyppeteer, we have the Puppeteer API directly available in Python. Sweet!
async def html2pdf(html, output_path: Path):
    browser = await pyppeteer.launch(headless=True, executablePath='/usr/bin/google-chrome', args=["--no-sandbox"])
    page = await browser.newPage()

    await page.setContent(html)
    page_margins = {"left": "1cm", "right": "1cm", "top": "1cm", "bottom": "1cm"}
    await page.pdf({'path': output_path, 'format': 'A4', 'margin': page_margins, "printBackground": True})
    await browser.close()
The result is a professionally looking PDF. Check it out!
